Unit Testing in Unity
I consider automated tests to be a cornerstone of building high quality software. Testing should be taken seriously in all aspects of software development and creating games in Unity should be no exception. In this tutorial I’ll focus on the unit testing aspect of test driven development (TDD).
I’ve found that Unity resources and tutorials rarely stress the importance of tests. This tutorial provides an introduction to unit testing and provides some guidance on how to write C# unit tests for Unity3D.
Unit tests in a nutshell
On the surface, unit testing is just a way of testing software. Unit refers to the smallest testable part of an application. In Unity C# (or in most OOP languages), the smallest testable part is an individual method. Each method has some functionality and the test is written to assert the expected behavior.
Unit tests are written independently from other parts of the code base. Dependencies on other classes can be substituted or mocked. This forms the basis of why unit tests push developers to create decoupled code. Tightly coupled interfaces make for a large number of dependencies and make testing difficult.
Tests don’t mean that your code is bug free. Unit tests evaluate functionality of individual methods and not the integration with other components and classes. Thus, unit testing cannot eliminate faults but only improve confidence in the code.
[Test]
public void MyUnitTest() {
    Counter counter = new Counter();
    counter.Add(1);
    Assert.AreEqual(1, counter.Count);
}
In this example, we have a class Counter which just keeps track of numbers added via Add(). We assert the behavior that the Counter state increments to 1 from 0.
Why you should write unit tests
I’ve seen many of developers skip unit tests. Writing tests are time consuming and in some cases they can be hard to write. Tests don’t add any new “features” so they don’t feel fun to write. Some devs just consider tests to be a waste of time. I’m not going to try and convince you to write unit tests but I’ll share the reasons as to why I believe in unit testing.
- Unit tests increase CONFIDENCE in your code. Unit tests allow you to make changes rapidly with confidence. You know if existing behavior works because your tests assert the correct behavior.
- Unit tests act as LIVING documentation. Unit tests provide a real example on how a method is expected to be used. It asserts the expected behavior and edge cases. It’s a living representation of your “feature” code.
- Unit tests improve the QUALITY and DESIGN of your code. It’s difficult to write unit tests for poorly designed components. Tightly coupled interfaces and lack of abstraction will make unit testing a nightmare.
- AUTOMATED pipelines. By having automated tests, you can have properly integrate new changes in your pipeline and have them tested. All on the fly, all automated, and with confidence.
- Unit tests save TIME. You won’t need to spend time manually testing and painstakingly checking existing code. Refactoring becomes a breeze. Building new features becomes easy.
What you need to know before you get started
Before we go over some samples, let’s look at the libraries that we will use for testing. Unity’s test runner uses a version of NUnit, a popular test framework for C#. NUnit was originally ported from JUnit, so many of the common patterns and use cases are applicable.
To access the test runner: Window > General > Test Runner
Moq and NSubstitute are also popular libraries for mocking / substituting dependencies.
The NUnit assemblies are included if running the tests in the editor. They are not included in builds of your project for target platforms.
How to write unit tests for Unity
A unit test should do a couple things:
- Test a single method
- Assert that the method behavior is as expected
Tests should be written with the assumption that implementation details don’t change the outcome. In other words, given an input, we expect an output. How that’s implemented shouldn’t matter to us.
Let’s go over a few simple examples.
public class HealthMonoBehaviour : MonoBehaviour
{
   public int Health { get; private set; }

   public bool IsDead
   {
      get { return Health <= 0; }
   }

   private void Start()
   {
      Health = 10;
   }

   public void RemoveHealth(int amount)
   {
      Health -= amount;
   }
}
Here we have a basic MonoBehaviour component, HealthMonoBehaviour. It contains a single public method RemoveHealth() which removes health. It also exposes a field with the current health value and whether the entity is “dead”.
A simple unit test for RemoveHealth() may look like this:
public class HealthMonoBehaviourTest
{
    [Test]
    public void RemoveHealthTest()
    {
        HealthMonoBehaviour healthMonoBehaviour = new HealthMonoBehaviour();
        healthMonoBehaviour.RemoveHealth(5);

        Assert.AreEqual(5, healthMonoBehaviour.Health);
    }
}
Go ahead and run the test. The test will fail and you’ll see the following warning message.
You are trying to create a MonoBehaviour using the ‘new’ keyword. This is not allowed. MonoBehaviours can only be added using AddComponent(). Alternatively, your script can inherit from ScriptableObject or no base class at all.
MonoBehaviours cannot be instantiated this way. They can’t be mocked or substituted either. There’s a couple ways around that but the approach I suggest is to design MonoBehaviours to be containers for your game logic. By keeping game logic separate from your Unity components, you write code that’s re-usable and loosely coupled. This way we can test our game logic independently of our MonoBehaviours.
Building testable components
Let’s start by extracting all health related logic from the MonoBehaviour.
public class HealthComponent
{
    public int Health { get; private set; }

    public bool IsDead
    {
        get { return Health <= 0; }
    }

    public HealthComponent(int health)
    {
        Health = health;
    }

    public void RemoveHealth(int amount)
    {
        Health -= amount;
    }
}
And the corresponding tests:
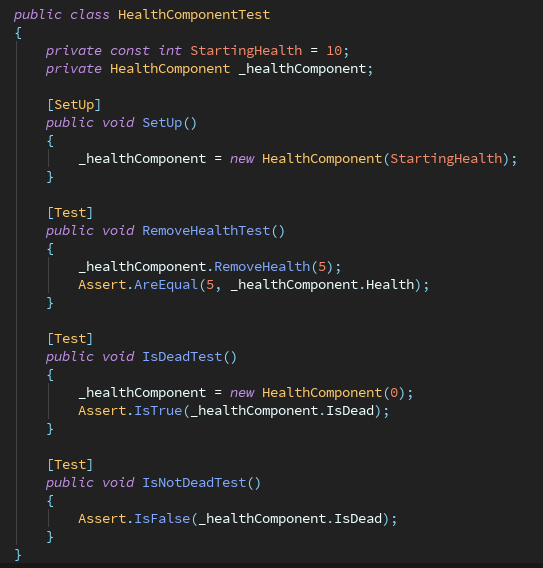
public class HealthComponentTest
{
private const int StartingHealth = 10;
private HealthComponent _healthComponent;
[SetUp]
public void SetUp()
{
_healthComponent = new HealthComponent(StartingHealth);
}
[Test]
public void RemoveHealthTest()
{
_healthComponent.RemoveHealth(5);
Assert.AreEqual(5, _healthComponent.Health);
}
[Test]
public void IsDeadTest()
{
_healthComponent = new HealthComponent(0);
Assert.IsTrue(_healthComponent.IsDead);
}
[Test]
public void IsNotDeadTest()
{
Assert.IsFalse(_healthComponent.IsDead);
}
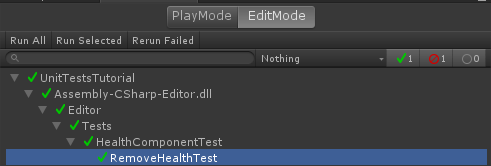
}Go ahead and run the tests again. This time they will pass.
Integrating with Unity MonoBehaviours
So how do we use our new component with Unity? By composition. We will use our MonoBehaviour as a container for all our game logic.
public class WorldEntityMonoBehaviour : MonoBehaviour
{
    public int StartingHealth = 10;
    private HealthComponent _health;

    void Awake()
    {
        _health = new HealthComponent(StartingHealth);
    }
}
WorldEntityMonoBehaviour contains an instance of HealthComponent. It also exposes a public StartingHealth field which is accessible from the inspector. We get the benefits of Unity through MonoBehaviour while also having the benefits of a loosely coupled and testable design.
Project files are available on github.
Create with confidence
Now that we have defined a few tests, we have laid the groundwork for designing robust software. Unit tests push developers to write code where behavior is easily definable in small “units”. I like to call this modular code.
If this is your first time writing a unit test it will take a bit of practice to get the hang of it. A good set of unit tests is extremely valuable to the quality of a code base. Spending the time and investing in developing these tests is just as valuable (if not more valuable) as churning out new features.
Unit tests are just part of a solution. A full suite of automated tests include more coupled tests such as integration or functional tests. In future posts we will explore more advanced testing topics such as dependency injection, mocking, functional, and integration tests.
Now that you have learned a little about Unit Testing in Unity, why not check out some other Unity skills in my other Unity tutorials.

Jonathan
Hey there, I’m Jon! I love landscape photography which is why I travel all the time! On my blog I’ll share all the best spots for epic sunsets and sunrises as well as some photography tips and tricks. I also have a interest in game design so you’ll find the occasional post about that too. Thanks for visiting!