Unity Cooldown Timer Tutorial

Cooldown timers are a critical part of most games. It can be used to track a cooldown or a monster spawner. A player casts a spell. He shouldn’t be able to cast it again right away, so a countdown is started and when it hits zero, the player can cast it again. In this tutorial, learn how to create a cooldown timer for unity.
Check out the updated version of the tutorial here.
You can use this timer for things such as ability cooldowns, monster spawners, and whatever else your game may need. We will also create a small demo using the Unity UI elements to demonstrate that everything is working.
Difficulty: Easy – You should know the basics of Unity and be comfortable writing small amounts of C# code.
Github: Get it here.
Code Setup
For the purpose of this tutorial and having a fully working demo, we will be including a few simple UI elements to visualize the timers. Therefore some parts of the code aren’t necessary for the timer, but you may remove it for your own uses.
Cooldown.cs
using UnityEngine;
using System.Collections;
using UnityEngine.UI;
public class Cooldown : MonoBehaviour {
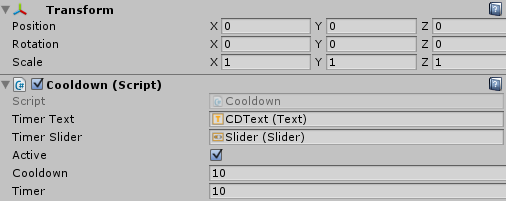
public Text timerText; //Demo UI elements
public Slider timerSlider;
public bool active; //Is this timer active?
public float cooldown; //How often this cooldown may be used
public float timer; //Time left on timer, can be used at 0
void Update () {
if(active)
timer -= Time.deltaTime; //Subtract the time since last frame from the timer.
if (timer < 0)
timer = 0; //If timer is less than 0, reset it to 0 as we don't want it to be negative
UpdateUI();
}
void UpdateUI()
{
//For purpose of demo
timerText.text = "Cooldown: " + timer;
timerSlider.value = (timer / cooldown);
}
public void CompleteAction()
{
if (timer > 0) //If timer greater than 0, don't complete action
return;
active = false; //Set active to be false so timer does not start moving until after action is complete. Remove this if you want timer to restart right away.
//Run Action Logic
timer = cooldown;
active = true;
}
}The actual code itself is short, less than 10 lines make up the entirety of the timer. The float “timer” keeps track of how much time is left until the action can be completed again. The action can be used when the timer value is 0. The timer starts again when reset.
Time.deltaTime is subtracted from the timer on each update(). Time.deltaTime is the time that Unity took to complete the last frame, or approximately the time since the last frame. This is useful since it’s independent from the actual time of the game, meaning we can pause or disable the ability and not have to recalculate any changes in time.
We also set the timer to 0 if the timer ever falls below 0. This isn’t necessary but for most purposes you wouldn’t want a cooldown below 0.
UI Demo Setup
The next part concerns the setup of the UI demo, you can skip this if you don’t plan on testing it out in a demo.
We create an empty GameObject to hold our Cooldown script. Inside the GameObject we create a UI->Canvas to hold the rest of the demo elements.
Inside the Canvas we create a Slider, a Text object, and a Button. I won’t go over the details of configuring the elements, as the entire project will be available on github for you to try.

While you’ll need to write some extra code to implement this in your own game, the basic gist of a cooldown timer is pretty simple. Hope this helps and if you need any help getting it to work with your game, feel free to comment below!
Interested in learning more about Unity? Check out my other unity tutorials!
Check out the updated version of the tutorial here.

Jonathan
Hey there, I’m Jon! I love landscape photography which is why I travel all the time! On my blog I’ll share all the best spots for epic sunsets and sunrises as well as some photography tips and tricks. I also have a interest in game design so you’ll find the occasional post about that too. Thanks for visiting!


“Inside the Canvas we create a Slider, a Text object, and a Button. I won’t go over the details of configuring the elements, as the entire project will be available on github for you to try.”
Not to rain on your parade, but this is sort of the “tutorial” part of the tutorial!
It works! Thanks!
Galatanu, glad that it worked for you! Enjoy 🙂