A Simple Dialog Quest System For Unity
In this tutorial you will learn how to create a simple and extensible dialog quest system for Unity. We will also create a simple dialog box UI to display the quest to the player. The system will use XML files to store dialog data and allow for different dialogs to be loaded on the fly.
Difficulty: Medium, you should have a intermediate understanding of C#, data structures, the Unity Scene Editor, Game Objects, and Prefabs.
Note: Updated Tutorial should be easier to follow now, github repository added for tutorial files!

Resource Setup
Since we will be storing our data in XML files, we will start by creating a sample quest to work with.
<Quest>
    <QuestTitle></QuestTitle>
    <Nodes>
        <Node>
            <NodeTitle></NodeTitle>
            <NodeText></NodeText>
            <NodeImage></NodeImage>
        </Node>
    </Nodes>
</Quest>
This is the format that I will use for the tutorial. Each quest will be stored in it’s own XML file, allowing for the following information to be saved. In addition to having a quest title, the quest line will also store an array of nodes, which represent each part of the dialog.
Each node can have a title, body text, and an image. Each of these elements are optional, as you will see later, the UI will organize the dialog accordingly.
Next let’s setup our asset folder structure to keep everything organized. Create the following folders and files.
 /Resources/Quests
 /Resources/Icons
 /Scripts
Now that we have all the preliminaries setup, we will get right into coding. Since the quests are being stored as XML files, we need to load them into Unity before we can use them. We also want to be able to reference them in our game world without having to reload them each time.
Quest Dialog System Scripts
QuestNode.cs – Represents a node within a quest.
using System.Xml.Serialization;

public class QuestNode
{
    [XmlElementAttribute("NodeTitle")]
    public string NodeTitle;

    [XmlElementAttribute("NodeText")]
    public string NodeText;

    [XmlElementAttribute("NodeImage")]
    public string NodeImage;

    public override string ToString()
    {
        return string.Format("[NodeTitle: {0} NodeText: {1} NodeImage: {2}",
            NodeTitle, NodeText, NodeImage);
    }
}
Quest.cs – Represents a quest, holds reference to a list of nodes in the quest, as well as current progression in the quest.
using System.Collections.Generic;
using System.Xml.Serialization;
using System.IO;

public class Quest
{
    [XmlArray("Nodes")] [XmlArrayItem("Node")]
    public List Nodes;

    [XmlAttribute("QuestTitle")]
    public string QuestTitle;

    [System.NonSerialized()]
    private QuestNode _currentNode;

    [System.NonSerialized]
    private int _position;

    /**
     * Returns the current node progress in quest and the moves to next node if possible.
     **/
    public QuestNode ProgressQuest()
    {
        if (HasNextQuestNode())
        {
            _currentNode = Nodes[_position++];
            return _currentNode;
        }
        return null;
    }

    private bool HasNextQuestNode()
    {
        return Nodes != null && _position < Nodes.Count;
    }

    /**
     * Loads quest from XML file.
     **/
    public static Quest LoadQuest(string fileName)
    {
        var serializer = new XmlSerializer(typeof(Quest));
        var stream = new FileStream(fileName, FileMode.Open);
        var quest = serializer.Deserialize(stream) as Quest;
        stream.Close();

        return quest;
    }
}
These two classes Quest and QNode represent our quest and node information from the XML file we created before. LoadQuest(string name) is a static method used to load a quest. Given a XML file, it uses XMLSerializer to de-serialize our xml data into the Quest and QNode objects.
QuestManager – Used to control and facilitate interaction between quest data and the UI. Also holds reference to node icons.
using UnityEngine;
using System.Collections.Generic;

public class QuestManager : MonoBehaviour
{
    private Dictionary<string, Sprite> _iconDict;

    [SerializeField]
    private Sprite[] _icons;

    [SerializeField]
    private GameObject _questDialog;

    void Start()
    {
        _questDialog.SetActive(false);
        LoadIconsFromSprites();
    }

    private void LoadIconsFromSprites()
    {
        _iconDict = new Dictionary<string, Sprite>();
        foreach (Sprite sprite in _icons)
        {
            _iconDict.Add(sprite.name, sprite);
        }
    }

    /**
     * Triggers the start of a quest
     * questFilePath: supply file path to the xml file
     **/
    public void StartQuest(string questFilePath)
    {
        _questDialog.SetActive(true);
        _questDialog.GetComponent()
            .Initialize(Quest.LoadQuest(questFilePath));      //Uses the Dialog UI and initializes the quest onto the display
    }

    public Sprite GetIcon(string iconName)
    {
        if (_iconDict[iconName] != null)
            return _iconDict[iconName];
        else
            return null;
    }
}
I chose to use a Dictionary<string, Sprite> so that icons could be looked up quickly. This is especially helpful when your game has a large number of icons. I was hoping to not have to use Sprite[] array, however it does not seem you can add references to the dictionary from the Component Inspector, so I used a work around, throw everything in the Sprite[] icons array, then on Start(), the script will populate the dictionary. If anyone has a better method of looking up the icons, please let me know!
QuestDisplay.cs – Add this as a component to your quest dialog. Used to update the dialog UI as the quest dialog progresses. Also hides the UI again when the quest is complete.
using UnityEngine;
using UnityEngine.UI;

public class QuestDisplayComponent : MonoBehaviour
{
    public Quest Quest;

    [SerializeField]
    private Image _nodeImage;
    [SerializeField]
    private Text _nodeTitle;
    [SerializeField]
    private Text _nodeText;
    [SerializeField]
    private QuestManager _questManager;

    private QuestNode _currentNode;

    public void Initialize(Quest quest)
    {
        Quest = quest;
        ProgressNode();
    }

    public void ProgressNode()
    {
        _currentNode = Quest.ProgressQuest();

        if (_currentNode == null)
        {
            gameObject.SetActive(false);
            return;
        }

        _nodeImage.sprite = _questManager.GetIcon(_currentNode.NodeImage);

        _nodeTitle.text = _currentNode.NodeTitle;
        _nodeText.text = _currentNode.NodeText;

        if (_nodeImage.sprite == null)
            _nodeImage.gameObject.SetActive(false);

    }
}
Now that we are finished with our scripts, let’s move on to populating our scene.
Scene and UI Setup
First create a UI->Canvas. We will need this to hold all our UI elements.
Create a Empty Object inside Canvas and name it Dialog. Add the QuestDisplay.cs and Event Trigger component. You will also assign the image, title, and text components (which we will create next).

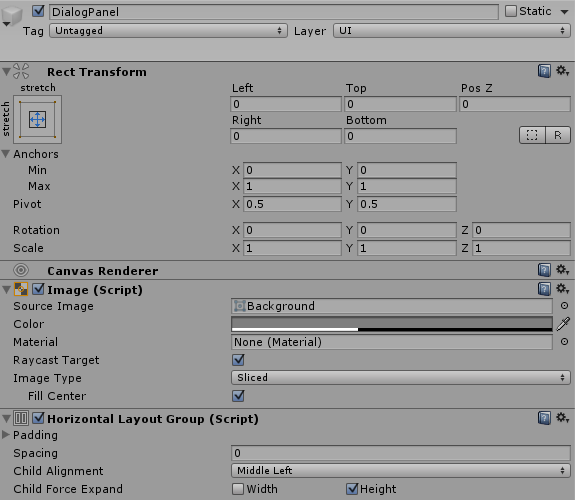
Inside the Dialog object we just created, add a UI->Panel. Name this DialogPanel. This will be used to layout the rest of the dialog elements. Add a Horizontal Layout Group.
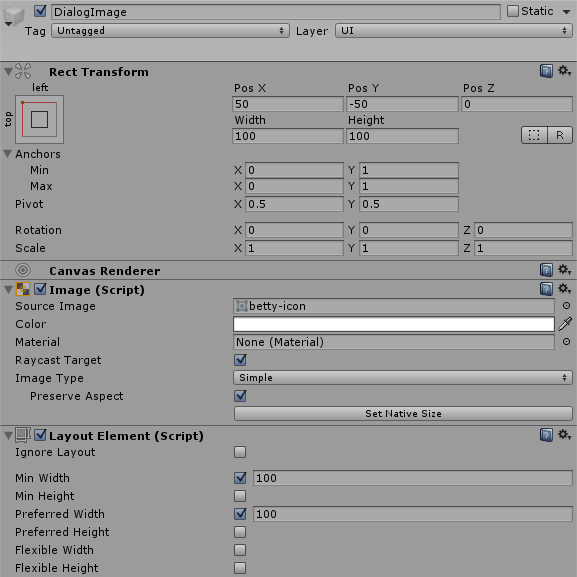
Now we will add an UI->Image inside the DialogPanel to display node icons. Add a Layout Element with the following properties.
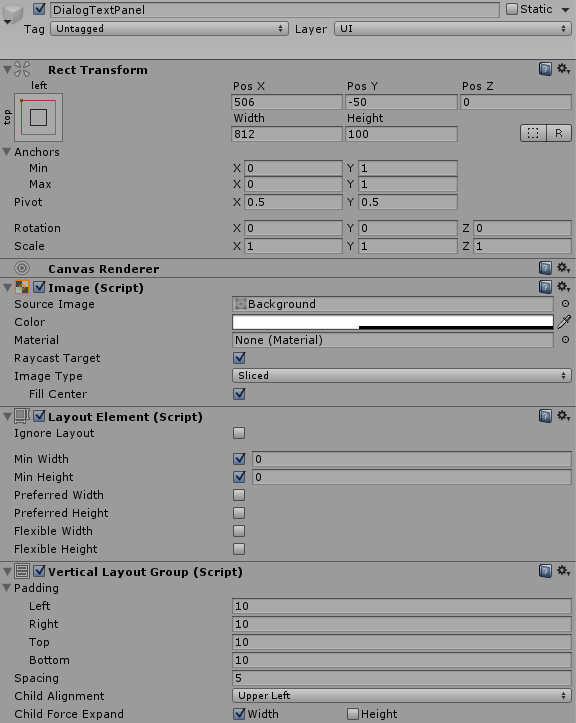
Now for the text. Since we have two types of text for our nodes (title & body), we will create another panel to help organize them. Create a UI->Panel and name it DialogTextPanel. This time we will use a Vertical Layout Group. Also add a Layout Element component to it.
Create two UI->Text objects inside the DialogTextPanel. Name one DialogTitleText and the other DialogText. You may style them to your liking.
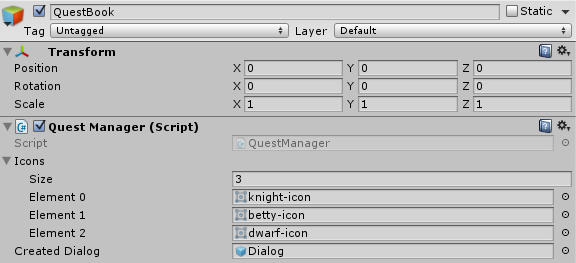
Finally create an Empty Object and add the QuestManager.cs script that we wrote before to it. Give it reference to your Dialog object and then add your icons to it.
Wrapping Up
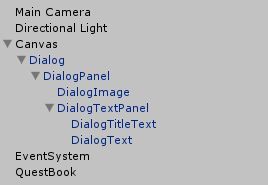
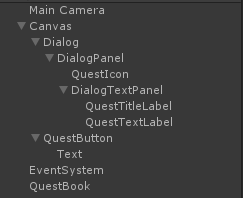
Your scene hierarchy should look like this.
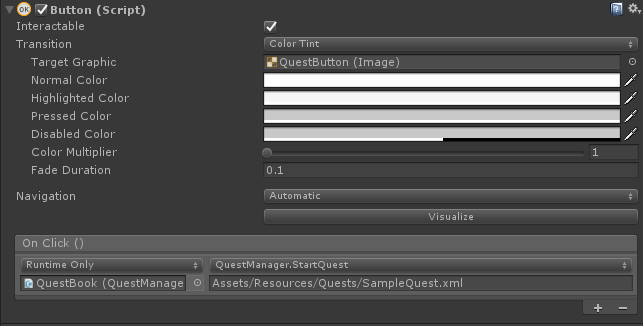
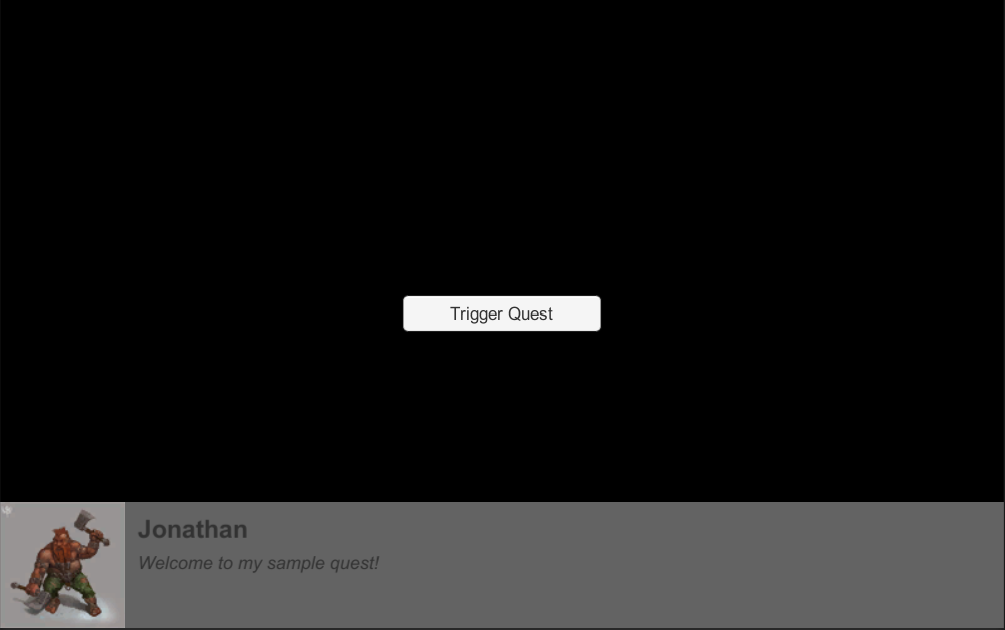
And here is the final project. I added two buttons as ‘triggers’ to the quests to test. However you can trigger your quests anywhere you want using the QuestManager.cs StartQuest(string questName) method. The quest will progress as you click on the dialog, moving onto the next node until it reaches the end of the quest.
You can easily expand on this by adding your own functionality, in addition to dialog. Some things that come to mind include panning the camera, presenting the player with choices, and so much more! Check back for part two of the tutorial where I will expand on the event trigger of the quests and add more functionality. Thanks for reading my tutorial! Hope it helps and would love to hear any questions or comments!
If you’re having trouble or just want to check out the tutorial project: Github.
Interested in Unity? Check out my other Unity tutorials.
If you’re looking for a simpler but more extensible quest / objective system, check out my new tutorial on creating a Dynamic Objective System in Unity.

Jonathan
Hey there, I’m Jon! I love landscape photography which is why I travel all the time! On my blog I’ll share all the best spots for epic sunsets and sunrises as well as some photography tips and tricks. I also have a interest in game design so you’ll find the occasional post about that too. Thanks for visiting!


Hey, the dictionary made the icon not optional. My quick fix that worked was:
public Sprite GetIcon(string iconName)
{
Sprite value;
if (iconDict.TryGetValue(iconName, out value)) {
return value;
} else {
return null;
}
}
Other than that, awesome! Love it!
Thank you so much for this tutorial.
I have been trying a lot of different tutorials
and yours is the best.
Thanks and keep up the good work
Love this tutorial, even more so for taking the time to do good old fashioned text and images rather than an overlong YouTube video. Looking forward to part II.
Hello, I have a problem with reading the xml file. I’ve been following the tutorial thoroughly but somehow I can’t call the XML file that i created and the button to test the dialog doea not work.
Hey Redha, thanks for reading my tutorial! I would love to help you solve your problem, could you describe the issue you’re having trouble with?
Hi, can you give me sample xml file, I couldnt run it.
Hi Ahmet, thanks for visiting. Hope I can help you: here is a link to a sample .xml file: https://gist.github.com/xjjon/5117ed74f97fb2f602fb7adb39f577cb
Make sure you are loading it from your Assets/Resources folder.
Let me know if you need any additional help.
Where do i put the
My Quest
Node 1
Text for Node 1 of my quest
myImage
code? in c# script??
These should go in the quest xml files
See an example: https://github.com/xjjon/Simple-Dialog-Quest-System-For-Unity/blob/master/Assets/Resources/Quests/SampleQuest.xml
I had two problems so far. First was the List declaration in ‘Quest.cs’. I had to change to List #Questnode# Nodes = new List#QuestNode#(); to avoid getting error. Now im stuck in StartQuest method in ‘QuestManager.cs’ when i do GetComponent() I get error saying type cannot be inferred from the usage.
Hi Dave,
Please try the sample located here: https://github.com/xjjon/Simple-Dialog-Quest-System-For-Unity
For your first error – it’s likely that your XML file did not serialize properly, hence the list is empty. Is the format for your quest correct? Take a look at this: https://github.com/xjjon/Simple-Dialog-Quest-System-For-Unity/blob/master/Assets/Resources/Quests/SampleQuest.xml
For the second error, you need to define the type when calling GetComponent. It should be GetComponent();