Data Structures For Tile Based Games
In this tutorial I’ll show you how to implement data structures for your tile-map / tile-based game. Using a grid based approach is a popular technique for many types of games, such as RPGs, board games, and RTS games. These games usually have a ‘top-down’ look, but other approaches can be tackled as well. For the purpose of this tutorial, we will refer to each ‘grid’ as a tile. Typically these tiles are smaller pieces of the board or map, and when put together, they represent the ‘game world’.

The Tile
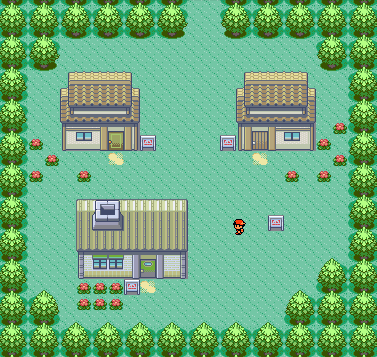
The most important part of a tile-map system is the tiles itself. This is where you’ll define most of your data and information. Most of your game logic will somehow interact with the tile map. Depending on the game, each implementation will be different but I will you show you a basic implementation. In my following examples, we will build a tile-map for an RPG similar to the image above.
Some considerations to make:
- Each tile has a ‘floor’ sprite
- There may be a ‘doodad’ or decoration over the floor sprite
- There may be a single ‘mob’ or entity on a tile at any given time
- There may be a ‘effect’ rendered on a tile
- Some tiles will be impassable
So it seems we need to keep track of the different layers of objects on our tile, as well as the sprite of the floor and whether it’s impassable or not. A quick implementation might look something like this.
public class Tile{

    bool isPassable;        //Is there collision
    int floorSprite;        //Sprite ID of floor

    Entity doodadLayer;
    Entity mobLayer;
    Entity effectLayer;

}
This gets the job done, but some improvements could be made. What if we wanted to add more layers? Your game logic would have to be altered every time you changed the layers.
To demonstrate how we can improve our Tile implementation, let’s also add a new layer “Trigger”. The trigger layer functions as a helper layer that can be triggered on certain events, such as entry or exit of tile. We could use this to trigger dialog or tutorials.
public class Tile{

    bool isPassable;        //Is there collision
    int floorSprite;        //Sprite ID of floor

    Dictionary<LayerType, Entity> layers = new Dictionary<LayerType, Entity>();

}

public enum LayerType{
    Doodad, Mob, Effect, Trigger
}
The layers have been replaced with a dictionary. So now if there are new layers, we just have to add them to the LayerType enum. To access a particular layer, all that’s needed is the LayerType and the tile it’s located on.
The Board
Once you have defined the structure for your tiles, you need to create a ‘board’ to represent the map. The simplest implementation would be a grid-like tile approach. A 2D array can be used, where one dimension represents the ‘x-axis’ and the other represents the ‘y-axis’. For this implementation, it’s easy to traverse and determine neighbors of a tile.
For example, assuming there is no diagonal movement:
- East (right) (x + 1, y)
- South (down) (x, y – 1)
- West (left) (x – 1, y)
- North (up) (x, y + 1)
Here’s what a basic implementation of Board could look like.
public class Board{

    Tile[,] tiles;
    int width, height;

    public Board(int width, int height){
        tiles = new Tile[width, height];
        this.width = width;
        this.height = height;
    }

    Entity GetAt(int x, int y, LayerType type){
        return tiles[y,x].layers[type];
    }
}
You should be able to see the benefits of using a dictionary to store the layers now. If we kept our first implementation, we would need a chain of if/else or switch statements to be able to return the right layer. We can even quickly enumerate through and call Update() functions on each entity.
We can even add some helper functions to make accessing the data easier.
public class Board{

    Tile[,] tiles;
    int width, height;

    public Board(int width, int height){
        tiles = new Tile[width, height];
        this.width = width;
        this.height = height;
    }


    Entity GetAt(int x, int y, LayerType type){
        return tiles[y,x].layers[type];
    }

    Tile GetAt(int x, int y){
        return tiles[y,x];
    }

    List<Tile> GetNeighbors(int x, int y){
        List<Tile> neighbors = new List<Tile>();
        if(isValid(x + 1, y))
            neighbors.Add(GetAt(x + 1, y));
        if(isValid(x, y - 1))
            neighbors.Add(GetAt(x, y - 1));
        if(isValid(x - 1, y))
            neighbors.Add(GetAt(x - 1, y));
        if(isValid(x, y + 1))
            neighbors.Add(GetAt(x, y + 1));

        return neighbors;

    }

    bool isValid(int x, int y){
        if(x < 0 || x > width - 1 || y < 0 || y > height -1)
            return false;
        return true;
    }
}
Now we can quickly check whether a given location is valid on the board, as well as gather all the neighbors for any given location. These types of actions are typically used a lot within your logic, so they should be implemented to avoid doing the same thing over and over.
As a challenge, can you implement a Location class to store x / y coordinates? Then use the location class to implement “direction” as an enum, so that you can quickly lookup the vectors for any given direction.
Since the logic varies so much for each game, I’ll leave that out of the tutorial. However, this system is flexible enough that you can now implement it for a wide variety of games. In the next part of the series, I will show you how to take your data implementation and visualize it in Unity. If you’re interested, here is a Github repo which I’ll use for future chapters of the tutorial as well.

Jonathan
Hey there, I’m Jon! I love landscape photography which is why I travel all the time! On my blog I’ll share all the best spots for epic sunsets and sunrises as well as some photography tips and tricks. I also have a interest in game design so you’ll find the occasional post about that too. Thanks for visiting!